iPod Classic Battery Connector Repair
iPod Classic Battery Connector Repair Service
Do you have an iPod Classic that was accidentally damaged during a repair attempt? If so, hope is not lost as our highly skilled technicians are here to lend you a helping hand. In this particular case, an iPod Classic was in the process of service when the plastic battery connector was broken from the main board of the device. When this connector had broken from the surface of the motherboard, there were a number of solder pads pulled from the circuit along with the traces that allow for electricity to flow to the proper locations of the device.
For most, this device would be written off as a loss at this point due to the extent of damage present, but this is no big deal for our technicians. As the plastic battery connector remains fully intact, this connector can be re-used without issue.

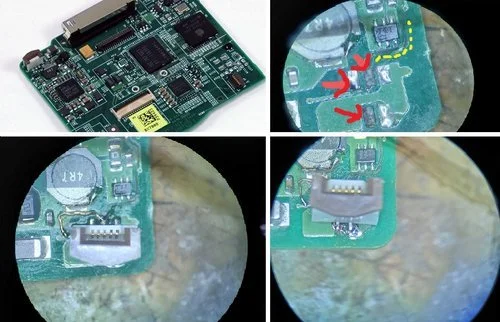
We can see in the microscope image images of the motherboard that two of the solder-pads have been completely pulled from the board and two traces have been damaged as well. In instances in which device schematics are not available to us, such as in this case with the iPod Classic, our technicians employ a strategy of what can be referred to as a sort of “circuit forensics” in which we can study the damaged connections visually as well as with a digital multimeter to determine where missing traces or components are supposed to be present. This would be significantly easier if another motherboard of the same model was available as a reference, but this luxury is not always available.

To rectify this situation, copper jumper wires are soldered to the remaining sections of the traces and to the solder pad that they are to connect to. These jumper wires are extremely small and delicate and thus precision and care must be considered. Enameled jumper wire is used to protect other circuit components if they were to come into contact with these jumper wires while
electricity is flowing through them.

With the jumper wires installed, the integrity of the connections can be verified by checking for continuity using a digital multimeter at a connected circuit component and the solder pad at which the jumper wires terminate. The battery connector can now be reinstalled by soldering the pins to the remaining solder pads and directly to the jumper wires installed.
At this time, the device can now be carefully tested with a battery and other critical components. With the repair successful, a UV-Curing Solder Mask is then applied to the repaired areas of the motherboard and cured with a UV light. This is to ensure maximum integrity of the repaired areas.

➡️If you have had a similar experience with an unfortunately unsuccessful DIY repair attempt and are looking for a solution, contact us today at www.microsolderingrepairs.com